The question every 3D creator is now asking
Can you really turn a single sentence, or one photo snapped on your phone, into a finished, game-ready 3D model in about a minute?
For years the honest answer was “no, not really.” You could coax a rough shape out of an AI generator, but it landed somewhere between a mood board and a mistake: lumpy silhouettes, tangled geometry, textures that fell apart up close, and an origin point floating somewhere off in the void. It was fine for inspiration and useless for production. Building anything you could actually ship still meant hours often days in Blender, Maya or ZBrush, sculpting, unwrapping UVs, rigging skeletons by hand and optimising for a target engine.
In 2026 the answer has flipped. For a fast-growing share of indie game developers, 3D-printing hobbyists, XR prototypers and product-design teams, that one-sentence-to-model promise is now close enough to true to build a workflow around and the tool most often behind it is Meshy. This feature takes the platform apart capability by capability: what each tool does, how to use it, what it costs in credits, where it genuinely excels, and just as importantly, where you’ll still need to roll up your sleeves.
The short answer
_1787653520.jpg)
Meshy is a browser-based, AI-powered 3D creation platform that converts text prompts or images into fully textured 3D models, then lets you retexture, retopologise, rig and animate them before exporting to major engines and 3D workflows, usually in minutes rather than days. Its current flagship generation engine is Meshy 7, launched on August 12, 2026, replacing Meshy-6 as the platform’s latest model. Meshy has evolved well beyond basic AI model generation into a broader 3D creation workflow covering generation, texturing, remeshing, rigging, animation and export. It is not a magic “ship-it” button for AAA studios, but for rapid iteration it removes an enormous amount of friction.
The problem Meshy is built to solve
3D content has always been one of the most expensive, time-consuming links in the chain for games, film, AR/VR, product design and 3D printing. A single production-ready character can absorb hours of modelling, texture painting, UV work, rigging and optimisation, before a single frame of animation. That cost is exactly why small teams ship fewer assets, why prototypes look grey and blocky for months, and why a lot of great ideas never make it past concept art.
Earlier AI generators promised to help but created new problems of their own. Three came up again and again:
- No real-world scale or sensible pivots. A crate might import at the size of a skyscraper with its origin miles from the mesh, adding a mandatory clean-up step to every generation.
- “Hallucinated” geometry. The AI guessed at the angles it couldn’t see, so the back of a model rarely matched the front.
- Messy topology. Triangle soup that was painful to retopologise, texture or rig, which meant it never left the concept-art bucket.
Meshy’s bet is that the winning tool is the one that removes friction across the entire pipeline, not just the first generation step, and that it can do so without asking the user to learn node-based modelling software. Figure 1 shows how that ambition maps onto an actual workflow.
How the whole thing fits together
_1787653544.jpg)
Read Figure 1 left to right. Three kinds of input, a text prompt (up to 800 characters, in any of 20-plus languages), one to eight reference images, or an existing mesh you already own — feed the same core engine. From there, work flows through five optional stages: Generate → Texture → Remesh → Rig → Animate. You can stop at any point. A 3D-printing hobbyist might only ever touch Generate and Remesh; a game studio might run the full chain and pipe the result straight into Unreal. Everything ends in a browser-side preview and a one-click export to the format your engine, printer or product needs.
The rest of this article walks each stage in turn. For every capability you’ll find a plain-English explanation, a specs-at-a-glance table, a numbered how-to, and the use cases where it earns its keep.
Capability 1 — Text-to-3D
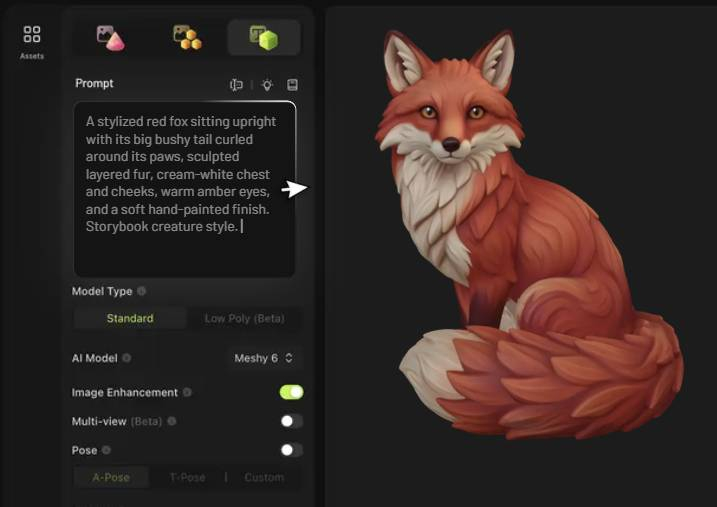
Text-to-3D is Meshy’s signature tool and the fastest way in. You describe an object in a sentence or two and the engine returns fully textured candidate meshes, often within minutes. Because it understands natural-language instructions and supports detailed prompts, it works for both quick ideation (“a mossy stone lantern”) and much more specific briefs involving materials, style, era and silhouette.
The important update for 2026 is Meshy 7, which launched on August 12 and is now Meshy’s flagship generation engine. That means creators evaluating Meshy today should judge its core Text-to-3D capabilities primarily through Meshy 7 rather than treating Meshy-6 as the latest generation.
Specs at a glance
| Attribute | Detail |
| Input | Detailed natural-language text prompts |
| Output | Textured 3D meshes with materials |
| Current flagship engine | Meshy 7 |
| Previous generation | Meshy-6 |
| Workflow | Generate → Texture → Remesh → Rig → Animate |
| Best for | Rapid concepts, game assets, stylised objects, characters and prototyping |
How to generate a model from text
1. Open Text-to-3D from the Meshy dashboard and select Meshy 7 where available.
2. Write a specific prompt. Name the object, style, materials and important visual characteristics — for example, “low-poly wooden treasure chest, iron bands, game asset, stylised.”
3. Choose the available generation and topology settings according to your intended use.
4. Generate the model and inspect it from multiple angles rather than judging it from the default preview alone.
5. Continue with texturing, remeshing, rigging or export depending on what the asset needs.
Where it shines
- Rapid ideation: Build scene concepts, props, plants and environmental assets without modelling each object from scratch.
- Stylised and organic subjects: Characters, creatures and handcrafted-looking objects remain particularly useful targets for AI-assisted 3D generation.
- Education and onboarding: Beginners can move from an idea to an editable 3D asset without first mastering a traditional modelling package
Capability 2 — Image-to-3D
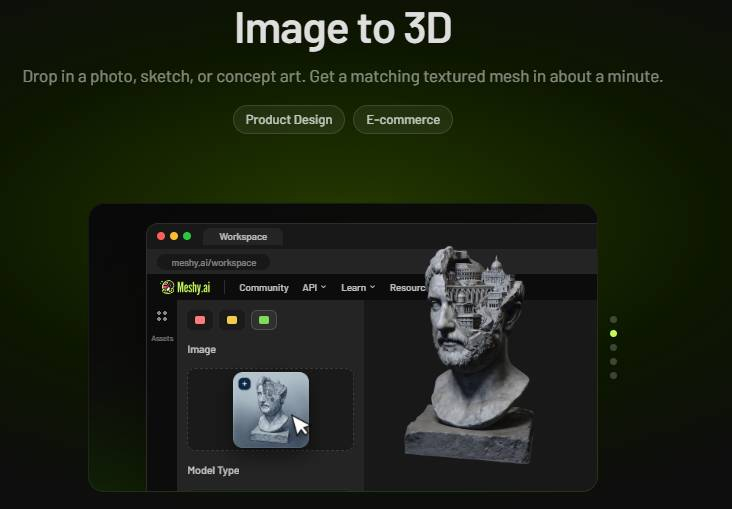
Image-to-3D reconstructs a 3D model from pictures and in real-world reviews it’s the single most-praised feature, especially among 3D-printing users turning photos of antiques, toys, sculptures, pets and even children’s drawings into printable objects. You can feed a single image for speed, or use multi-view input (front, side and back) to lock down geometry and stop the engine “guessing” the angles it can’t see a major reason results have become far more faithful.
Specs at a glance
| Attribute | Detail |
| Input | 1–8 images: photos, sketches or concept views |
| Single vs multi-view | One image = fastest; multiple views = tighter, more accurate geometry |
| Output | Textured 3D mesh reconstructed from the reference(s) |
| Best for | Real objects, existing concept art, and anything you can photograph |
| Typical credit cost | ~20 credits per image-to-3D generation |
| Watch-outs | Busy backgrounds and reflective/transparent surfaces reduce accuracy |
How to turn a photo into a 3D model
- Shoot or gather clean references. Even lighting, plain background, and — ideally — front, side and back views of the subject.
- Open Image-to-3D and upload one image for a quick pass, or several for multi-view accuracy.
- Generate and inspect the mesh, rotating it to check the reconstructed back and underside.
- Retexture or remesh if needed, then export to STL/3MF for printing or GLB/FBX for a game engine.
Where it shines
- 3D printing from life: heirlooms, miniatures, replacement parts and kids’ artwork made physical.
- Concept-art to model: bring an existing 2D design into 3D without re-modelling it by hand.
- Product mock-ups: photograph a real object and iterate on it digitally.
Capability 3 — AI Texturing & Retexture
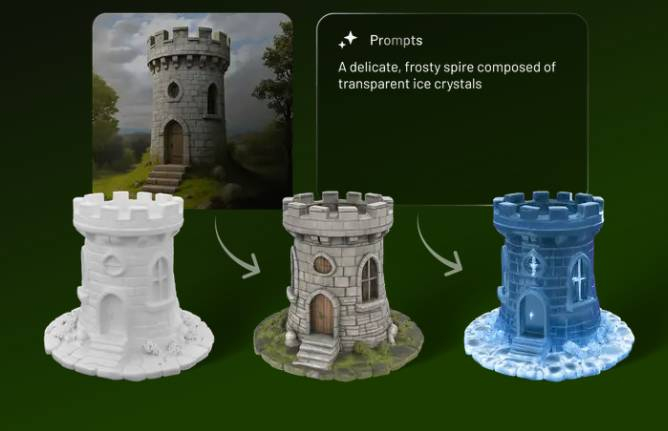
Texturing is where a grey mesh becomes believable. Meshy applies full PBR (physically based rendering) materials — with separate metallic, roughness and normal maps — either from a text prompt or a reference image, so surfaces respond correctly to dynamic lighting in your engine. Crucially, retexture works on your own imported models too, not just Meshy-generated ones, and you can mask specific parts to re-skin just a region rather than the whole object.
Specs at a glance
| Attribute | Detail |
| Guidance | Text prompt or reference image |
| Maps produced | PBR set — base colour, metallic, roughness, normal |
| Resolution | High-resolution PBR output (up to 8K on higher tiers) |
| Targeted edits | Paint masks to retexture only selected parts of a model |
| Works on | Meshy models and your own uploaded meshes |
| Typical credit cost | ~10 credits per texturing / retexture pass |
How to texture or restyle a model
- Select a model — one you generated, or an uploaded FBX/OBJ/GLB.
- Open the Texturing / Retexture tool and describe the finish you want (“weathered bronze, green patina”) or drop in a reference image.
- Mask parts (optional) to restyle only a region — say, just the blade of a sword.
- Generate, compare variants, and save the maps you like.
- Export the fully textured model in your preferred format.
Where it shines
- Material exploration: try ten finishes on the same asset in minutes.
- Rescuing older assets: re-skin a model you already own to fit a new art direction.
- Consistent asset packs: apply a shared look across a themed set of props.
Capability 4 — Smart Remesh & Retopology
A beautiful mesh with bad topology is a liability: it’s hard to texture cleanly, heavy to render, and as we’ll see often impossible to rig. Meshy’s Smart Remesh automatically rebuilds polygon flow so the model behaves. You can adjust the target polycount, switch between triangle and quad topology, and optimise for very different destinations: a lightweight budget for mobile or VR, or a dense mesh for high-end cinematics.
Specs at a glance
| Attribute | Detail |
| Function | Automated retopology — rebuilds clean polygon flow |
| Controls | Target polycount; triangle ↔ quad topology toggle |
| Optimises for | Mobile / VR budgets through to high-end cinematic density |
| Pipeline role | Run before rigging for the most reliable bone binding |
| Works on | Meshy models and imported meshes |
| Typical credit cost | ~5 credits per remesh |
How to remesh for your target
- Open the Remesh tool on the model you want to optimise.
- Choose topology type quads for animation and clean deformation, triangles for direct engine use.
- Set the polycount to match your platform: low for mobile/VR, high for renders.
- Generate, then rig, texture or export the optimised result.
Capability 5 — Auto-Rigging
Rigging, building a skeleton inside a model and binding the mesh to it so it can move is traditionally slow, technical work. Meshy’s Auto-Rigging analyses character geometry, creates an appropriate skeleton and automatically handles much of the skinning process.
An important pricing detail is easy to miss: rigging is currently free for Meshy subscribers. It should therefore not be presented as consuming approximately 10 credits for subscribers.
Specs at a glance
| Attribute | Detail |
| Supported models | Character models supported by Meshy’s rigging workflow |
| Function | Automatic skeleton generation and skinning |
| Preparation | Clean topology and an appropriate character pose improve results |
| Workflow | Remesh → Rig → Animate → Export |
| Subscriber credit cost | Free |
| Export | Rigged models can continue into animation/export workflows |
How to rig a character
1. Start with a clean character model, generated in Meshy or imported into the platform.
2. Remesh first when topology or polygon density could interfere with deformation.
3. Open the Rigging tool and let Meshy process the character.
4. Review the resulting rig and character deformation.
5. Export the rigged model or continue directly into Meshy’s animation workflow.
Where it shines
- NPC and hero characters for indie games, ready to drop into Unity or Unreal with working bones and weights.
- Fantasy creatures: dragons, griffins, wolves and centaurs rig fine as long as the body plan is recognisable.
- Anyone who has never rigged before and wants a poseable character without weight-painting.
Capability 6 — AI Animation
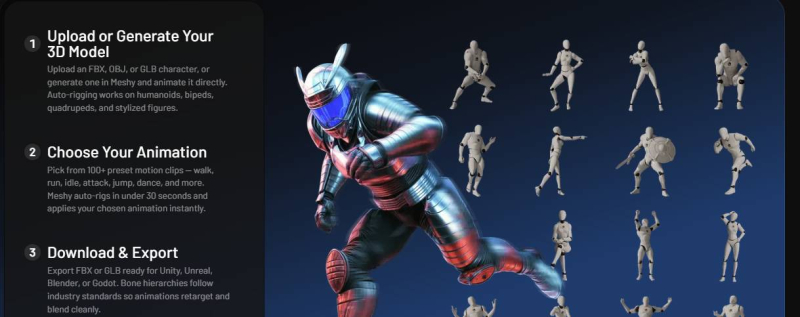
Once a character is rigged, Meshy’s Animate workflow lets creators apply motion without building every animation manually in traditional 3D software. This makes the generation-to-animation pipeline especially useful for prototypes, game characters, pre-visualisation and fast-moving creative projects.
Most importantly for pricing, animation is currently free for Meshy subscribers, so the previous statement describing the rig/animate step as costing approximately 10 credits should be removed.
Specs at a glance
| Attribute | Detail |
| Requirement | A compatible rigged character |
| Workflow | Rig → Select/apply animation → Preview → Export |
| Use cases | Game characters, prototypes, pre-viz and animated concepts |
| Output | Animated 3D asset for supported downstream workflows |
| Subscriber credit cost | Free |
How to animate a character
1. Rig the character first or open a compatible already-rigged model.
2. Open Meshy’s animation options and preview an appropriate motion on the character.
3. Apply the animation that best matches your intended use.
4. Preview deformation and movement before export.
5. Export the animated asset in a format suitable for your downstream workflow.
Capability 7 — Meshy 3D Agent
Announced in mid-2026 and billed by Meshy as the first AI agent purpose-built for 3D creation, the Meshy 3D Agent turns the whole pipeline into a chat. Instead of clicking through each tool, you describe what you want and the agent brainstorms directions, generates models, remeshes, rigs and animates — and can batch-generate a themed set while keeping style consistent across it. It’s aimed squarely at the moment when you need to fill a scene or an asset pack quickly and coherently.
Specs at a glance
| Attribute | Detail |
| What it is | A conversational agent that drives Meshy’s tools for you |
| Can do | Brainstorm concepts, generate, remesh, rig and animate from chat |
| Batch mode | Generate a themed set of assets with consistent style |
| Status | Launched in beta in 2026; evolving quickly |
| Best for | Filling scenes and asset packs; users who prefer describing over clicking |
How to work with the agent
- Open the 3D Agent chat and describe your goal (“a set of five matching medieval market stalls”).
- Pick a direction from the options it pitches, and let it generate.
- Ask for follow-ups in plain language — remesh, rig, animate, or generate more in the same style.
- Download the results, individually or as a batch.
Capability 8 — API, MCP & Integrations
For technical users, the API is where Meshy stops being an app and becomes infrastructure. Every generation feature is exposed over HTTPS text-to-3D, image-to-3D, multi-image-to-3D, retexture, remesh and animation with an interactive playground to try calls before you wire them in. There are native plugins for Blender, Unity, Unreal, Godot, Roblox (via the Meshy Bridge app), Houdini and ComfyUI, plus a USD-compatible path into NVIDIA Omniverse.
Newer still is the Meshy MCP server, which wraps the API as a set of tools an AI assistant can call directly. Install it once with your API key and assistants such as Claude, Cursor or Copilot can generate, texture and rig models from plain chat you can even chain Meshy with a Blender MCP for an end-to-end pipeline. One expectation to set: each request is a task that consumes credits, and MCP-generated assets follow the same credit rules as the web app.
Specs at a glance
| Attribute | Detail |
| API endpoints | Text-to-3D, image-to-3D, multi-image-to-3D, retexture, remesh, animation |
| Access tier | API access from the Pro tier upward |
| Playground | Interactive console to test endpoints before integrating |
| Plugins | Blender, Unity, Unreal, Godot, Roblox, Houdini, ComfyUI (+ more) |
| MCP server | Install: npx add-mcp @meshy-ai/meshy-mcp-server — works with Claude, Cursor, Copilot |
| Export formats | FBX, GLB, OBJ, STL, 3MF, USDZ, .blend |
HOW TO ADD MESHY TO AN AI ASSISTANT (MCP)
- Generate an API key in your Meshy account (Pro tier or above).
- Install the MCP server with the one-line npx command, passing your key as MESHY_API_KEY.
- Point your assistant (Claude, Cursor, Copilot) at the server; it gains a full set of 3D tools.
- Prompt in chat , e.g. “generate a low-poly medieval forge with PBR textures and give me the download link.” The assistant confirms cost-affecting choices, runs the task, and returns the file.
Which tools matter for which creators
Not every capability matters equally to every user. Figure 5 maps how central each tool tends to be for seven common audiences the denser the cell, the more you’ll lean on that tool. It’s a quick way to see your own “core” subset before you commit to a plan.
A few patterns jump out. Indie game developers are the one group that lights up almost the entire row
they touch generation, texturing, remeshing, rigging and animation. 3D-printing hobbyists, by contrast, cluster hard on Image-to-3D and Remesh and barely need rigging or animation at all. Studios and XR teams put unusual weight on the API and MCP column, because their value comes from wiring Meshy into an existing pipeline rather than clicking through the UI. Find your row, and let it tell you which sections above to re-read.
Pricing and the credit system
Meshy uses a credit-based system for many AI generation and processing tasks, but not every feature currently consumes credits for subscribers. That distinction matters when estimating the real cost of producing a finished asset.
Generation, texturing, remeshing and other AI operations may consume credits depending on the model, settings and subscription, while rigging and animation are currently free for subscribers. Because Meshy can change its models, plans and task pricing over time, creators should check the current in-app credit estimate before launching a generation rather than treating older per-task figures as permanent.
Your practical monthly cost therefore depends primarily on how heavily you use credit-consuming generation and processing tools, how often you iterate, and the subscription tier you choose.
Important: Rigging and animation currently cost 0 credits for subscribers. They should not be included in calculations that estimate subscriber credit usage per finished animated character.
Plans compared
| Plan | Price* | Monthly credits | Who it’s for & notable terms |
Free |
$0 |
~100 | Evaluating Meshy. Outputs carry a CC BY 4.0 licence (attribution required); lower queue priority; single task at a time. |
Pro |
$20/mo |
~1,000 | The practical first paid tier. ~60% faster generation, API access, private assets, ~10 concurrent tasks, free retries. |
| Premium | $40/mo | ~3,000 | Individuals regularly exceeding 1,000 credits/month. |
| Ultra | $100/mo | ~8,000 | High-volume solo production. |
| Studio | team plan | shared pool | Teams: shared credits, collaboration, more concurrency and retries (minimum 2 seats). |
| Enterprise | custom | custom | Scale, security and support: SSO, workspace management, community model API. |
Strengths, limits and the problems you’ll actually hit
No honest feature article ends at the marketing. Meshy is genuinely strong in some areas and still frustrating in others, and knowing the difference is what separates a smooth workflow from a wasted afternoon. Figure 6 is a directional map of where the platform is production-ready versus where you should expect manual clean-up.
The pattern is consistent across independent reviews: Meshy is fast and strong on organic and stylised subjects and dependable at texturing, but it underperforms on hard-surface and mechanical geometry cylinders, vehicles, weapons and engineering parts where structural accuracy suffers. Two other complaints recur: prompt fidelity on long, highly specific text prompts (you sometimes get something adjacent to what you asked for, and iterating costs credits), and run-to-run consistency, including inconsistent T-pose/A-pose output that complicates rigging.
The honest ledger
| Strengths | Trade-offs & limitations |
| Speed: a textured model in ~60 seconds | Hard-surface geometry is weaker than organic |
| Organic & stylised assets look great | Complex prompts can drift from the brief |
| Full pipeline in one tab — no tool-hopping | Run-to-run consistency varies; T-pose can be unreliable |
| Strong PBR texturing, incl. on your own models | Post-processing (silhouette, internal faces, UVs, scale, print repair) still needed for production. |
| Broad exports & integrations (7 formats, MCP, plugins) | Credit model : iteration costs add up; credits don’t roll over |
| Runs in-browser plus iOS & Android apps | Free-tier licence (CC BY 4.0) requires attribution |
Bottom line on limitations: Meshy is a superb accelerator, not a replacement for a 3D artist on hero assets. For AAA work, artists will still want manual control; for indies, prototypers, educators and creators, it can compress days of work into minutes provided you budget a little clean-up time and lean on its strengths.
Use cases by industry
Game development
This remains one of Meshy’s strongest use cases. Teams can generate props and characters with Meshy 7, optimise assets through remeshing, auto-rig suitable characters, add animation and export them into their wider game-development workflow.
The combination is particularly attractive for prototypes and indie production because several traditionally separate stages can happen within the same platform. With rigging and animation currently free for subscribers, teams can also experiment with character movement without consuming additional credits for those two stages.
3D printing & digital fabrication
Image-to-3D plus multi-colour output has made Meshy a favourite among makers. Photograph an object (or a child’s drawing), reconstruct it, remesh for a clean watertight model, and export STL or 3MF for a slicer. This is the workflow reviewers praise most — turning the physical and the imagined into printable keepsakes.
XR, AR & VR prototyping
Speed and lightweight budgets matter most here. Generate assets, remesh aggressively for mobile/VR performance, and use the USDZ export and Omniverse-compatible path to get content into headset experiences fast. The API/MCP route lets XR teams wire generation into their own tooling.
Product & concept design
Designers move from a sketch or a sentence to a 3D mock-up in minutes, iterate on materials with AI texturing, and share a turntable long before committing to CAD. It’s ideation and communication, not final engineering but it shortens the front of the process dramatically.
Animation & film
For pre-viz and background characters, Meshy’s rig-and-animate chain fills a scene quickly. Hero assets still get hand-crafted, but the long tail of set dressing and crowd characters can be generated, animated and exported to Blender or Maya for finishing.
Education & creative programmes
Because nothing needs installing and the barrier to a first model is a single sentence, Meshy fits classrooms and workshops well. Coordinators turn students’ drawings and ideas into tangible 3D prints — a fast, motivating bridge from imagination to object.
Getting started in ten minutes
You can go from zero to a downloaded model without installing traditional 3D modelling software first.
- Create a Meshy account and open the 3D creation workspace.
- Start with Text-to-3D using Meshy 7, the current flagship engine. Write one concrete prompt and generate your first asset.
- Try Image-to-3D when you already have concept art, a sketch or photographic reference.
- Refine and Remesh your preferred result to suit its intended destination.
- Texture the model using the available AI texturing tools.
- If it is a suitable character, Rig and Animate it. For subscribers, these two stages are currently free in terms of credit consumption.
- Export the result in the format required by your engine or downstream 3D application.
- If you begin generating assets regularly, compare subscription tiers based on the credit-consuming operations you actually use rather than assuming every pipeline step costs credits.
How Meshy sits among alternatives
Meshy isn’t alone. The most common comparisons in 2026 are with Tripo, Rodin and Luma AI, alongside tools such as CSM, Kaedim and Hyper3D. Broadly, Meshy competes on breadth an all-in-one, in-browser pipeline with strong texturing and deep integrations while rivals differentiate on topology control, editing suites or raw speed. The right choice depends on whether you value a single end-to-end tab (Meshy’s pitch) or deeper manual control at specific stages.
| Tool | Reputation in 2026 (directional) |
| Meshy | All-in-one browser pipeline; strong texturing, rigging & animation, broad exports and MCP; weaker on hard-surface. |
| Tripo | Often praised for quad-dominant topology and an editing/studio suite; a frequent head-to-head. |
| Rodin | Cited for high-detail generation; another common comparison point. |
| Luma AI | Known for capture/NeRF-style workflows and scene reconstruction. |
| Others | CSM, Kaedim, Hyper3D — each with a different niche (avatars, retopo services, speed). |
The practical takeaway: if you want the widest set of capabilities in one place and a gentle learning curve, Meshy is the default recommendation. If your bottleneck is a specific stage, say, clean quad topology for animation it’s worth trialling a specialist alongside it.
The verdict
Back to the question we opened with: can a sentence or a photo really become a finished 3D model in about a minute? In 2026, for a large and growing set of use cases, yes, and Meshy is the most complete tool delivering on it. It has matured from an interesting demo into a serious platform that handles generation, texturing, retopology, rigging, animation and export in a single browser tab, with an API, an MCP server and an agent layered on top.
It is not flawless. Hard-surface geometry, prompt fidelity on complex briefs, and run-to-run consistency remain real limitations, and production work still needs a human to clean up silhouettes, topology, scale and materials. But judged as an accelerator, a way to compress days of pipeline into minutes, it is genuinely excellent. For indie developers, 3D-printing hobbyists, XR prototypers, educators and design teams, Meshy earns its place in the toolkit. For hero assets in AAA and high-end film, treat it as a fast first draft, not the final word.
FAQs
Is Meshy rigging free?
Yes. Rigging is currently free for Meshy subscribers.
Is Meshy animation free?
Yes. Animation is currently free for subscribers.
Can Meshy turn images into 3D models?
Yes. Meshy can convert single or multiple reference images into 3D models.
Is Meshy good for game development?
Yes. It is useful for fast asset generation, texturing, remeshing, rigging, animation and prototyping.
Post Comment
Share your thoughts about this article.
Be the first to post a comment!