In the world of audio production, pristine sound quality is paramount. Whether you're a budding podcaster, a musician recording a demo, or a content creator crafting the perfect video, unwanted background noise can be the single greatest obstacle to a professional-sounding product. From the gentle hum of a computer fan to the intrusive rumble of distant traffic, these extraneous sounds can distract listeners and diminish the impact of your message. Fortunately, you don't need a state-of-the-art recording studio or a hefty budget to achieve crystal-clear audio. This guide will walk you through free and effective methods to remove background noise, ensuring your audio is polished and professional. We'll explore both a user-friendly online tool and a powerful open-source software, empowering you to choose the best solution for your needs.
Method 1: Removing Noise with an Online Tool (Ease and Accessibility)
For those seeking a quick and hassle-free solution, online noise reduction tools are an excellent choice. These platforms leverage the power of artificial intelligence to automatically detect and eliminate background noise, requiring minimal technical expertise from the user. One such tool is the EaseUS Online Vocal Remover.
EaseUS offers a simple and intuitive way to clean up your audio directly from your web browser. It's an ideal option for users who want to avoid downloading and installing software and prefer a straightforward, "upload, process, download" workflow.
Main Features of EaseUS Online Vocal Remover:
- AI-Powered Noise Reduction: Automatically identifies and removes various types of background noise, including wind, hiss, and hum.
- Vocal and Stem Separation: Beyond noise reduction, it can separate vocals from music, a useful feature for creating karaoke tracks or remixes.
- Wide Format Support: Accepts a variety of audio and video file formats, such as MP3, WAV, M4A, and MP4.
- Cloud-Based Processing: All the heavy lifting is done on their servers, so you don't need a powerful computer to use it.
- User-Friendly Interface: The entire process is designed to be simple and accessible, even for beginners.
How to Remove Noise with EaseUS Online Vocal Remover
Removing background noise with EaseUS is a straightforward process that can be completed in just a few clicks.
Step 1: Upload Your Audio File
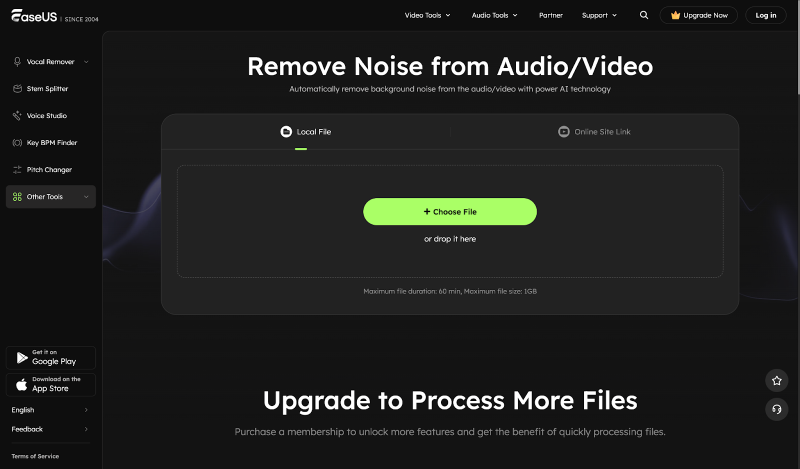
Navigate to the EaseUS Online Vocal Remover. You'll be greeted with a simple interface prompting you to upload your audio or video file. You can either drag and drop your file directly onto the webpage or click the "Choose File" button to select it from your computer.

Step 2: AI-Powered Processing
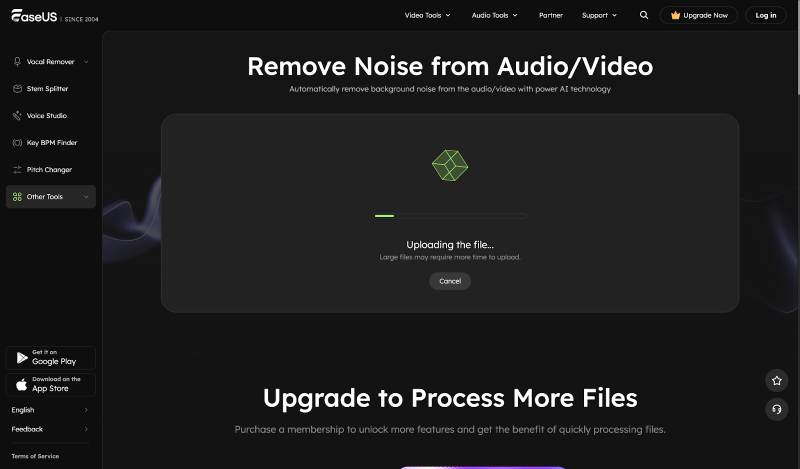
Once your file is uploaded, the AI will automatically analyze the audio to identify and separate the background noise from the primary audio, such as speech or music. This process is typically very fast, often taking only a few seconds to a minute, depending on the length of your audio file.

Step 3: Download Your Cleaned Audio
After the processing is complete, you will be presented with the cleaned-up audio file. You can preview the result to ensure you are satisfied with the noise reduction. If you are, simply click the download button to save the high-quality, noise-free audio file to your computer.
Method 2: Removing Noise with Audacity
For users who desire more control and a robust set of audio editing features, Audacity is an exceptional free and open-source option. While it has a steeper learning curve than online tools, it offers a powerful and highly customizable noise reduction effect.
Pros of Audacity:
- Free and Open-Source: No subscriptions or hidden costs.
- Powerful Noise Reduction: Offers granular control over the noise reduction process.
- Comprehensive Editing Suite: Includes a wide range of audio editing tools beyond noise reduction.
- Cross-Platform Compatibility: Available for Windows, macOS, and Linux.
Cons of Audacity:
- Steeper Learning Curve: May be intimidating for absolute beginners.
- Requires Software Installation: Unlike online tools, you need to download and install it on your computer.
How to Remove Noise with Audacity
Audacity's noise reduction process involves two main steps: first, you "teach" the software what the background noise sounds like, and then you apply the reduction to the entire track.

Step 1: Get a Noise Profile
1. Open your audio file in Audacity. You should see the waveform of your audio track.
2. Find a section of the audio where there is only background noise and no desired sound (like speech or music). This is crucial for the software to learn what to remove. Select a few seconds of this "room tone."
3. Go to the "Effect" menu and select "Noise Reduction."
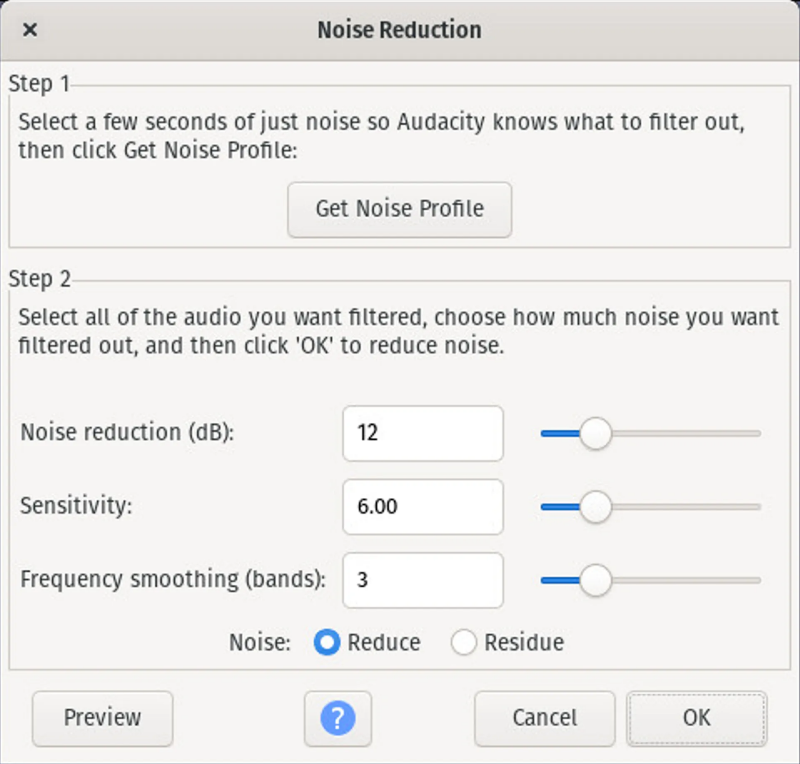
4. In the Noise Reduction window, click the "Get Noise Profile" button. This tells Audacity that the selected audio is the noise you want to remove.
Step 2: Apply Noise Reduction
1. Now, select the entire audio track from which you want to remove the noise. You can do this by clicking "Select" in the menu and then "All," or by using the keyboard shortcut Ctrl+A (or Cmd+A on a Mac).
2. Go back to the "Effect" menu and select "Noise Reduction" again.
3. This time, you will adjust the settings in the "Step 2" section of the window. The three main sliders are:
○ Noise Reduction (dB): This controls how much the noise is reduced. A good starting point is around 12 dB.
○ Sensitivity: This determines how aggressively Audacity will treat audio as noise. The default setting of 6 is often a good balance.
○ Frequency Smoothing (bands): This can help to reduce artifacts that may be introduced during the noise reduction process. The default of 3 is usually sufficient.
4. Click the "Preview" button to listen to a short sample of the audio with the noise reduction applied. If it sounds good, click "OK" to apply the effect to the entire selection. If the audio sounds distorted or "watery," you may need to reduce the "Noise Reduction (dB)" or "Sensitivity" settings and try again.
Tips for Preventing Background Noise During Recording
While post-production tools are invaluable, the best way to achieve clean audio is to prevent background noise from being recorded in the first place. Here are a few tips to help you capture cleaner audio from the start:
- Choose a Quiet Recording Space: This is the most critical factor. Find a room that is away from sources of noise like traffic, air conditioners, refrigerators, and computer fans.
- Use a Dynamic Microphone: Dynamic microphones are generally less sensitive to distant sounds than condenser microphones, making them a better choice for untreated recording environments.
- Get Close to the Microphone: The closer you are to the microphone, the stronger your voice signal will be in comparison to the background noise. Aim for a distance of about 6-12 inches.
- Use a Pop Filter: A pop filter not only reduces plosive sounds (like "p" and "b") but can also help to create a consistent distance between you and the microphone.
- Turn Off Unnecessary Electronics: Before you start recording, turn off any fans, air conditioners, and other devices that produce noise.
Even with the best recording practices, some background noise is often unavoidable. But don't worry, if you still find unwanted noise in your recordings, you can always rely on the power of AI with tools like the EaseUS Online Vocal Remover to effortlessly clean up your audio.
Summary
Removing background noise is an essential step in producing high-quality audio. For those who prioritize speed and simplicity, the EaseUS Online Vocal Remover is an excellent choice. Its AI-powered, browser-based approach makes it incredibly easy to remove noise without any technical expertise. For users who want more control and a comprehensive suite of editing tools, Audacity provides a powerful and free solution. By combining good recording techniques with the right noise reduction tools, you can ensure that your audio is always clear, professional, and free from distracting background noise.
Post Comment
Be the first to post comment!


