Electronic SIM technology (eSIM) has quickly revolutionised how we use our smartphones. Unlike the SIM cards with the risk of getting lost while switching, eSIM only requires you to switch between networks and profiles through QR codes or an app. The program is embedded in your device; you can activate it and reprogram it remotely.
eSIM offers flexibility, allowing you to have multiple profiles on one device. By switching to this technology, you are future-proofing your device and ensuring compatibility with upcoming technologies. Learn more about eSIM, from its installation to activation and ensuring a smooth and efficient operation.
Checking device compatibility and unlocking status
Before we show you how to check the compatibility and unlocking status, it is essential to understand what they mean. Compatibility is simple and straightforward. But what does 'unlocking status' mean?
The unlocking status, or the “carrier lock”, is just a software restriction placed on your smartphone by the mobile carrier you purchased from, say, Verizon, AT&AT, or Vodafone. So, this restriction is to see that a device can only be used with that specific carrier's network. Think of it like a coffee machine that only accepts one brand of pods.
So, how do you check if your device is compatible with eSIM or if it's unlocked? Here is how:
For iPhone User
- Open your device Settings > General > About
- Scroll down till you see “Carrier Lock” or “Network Provider Lock”
- If it says “No SIM restrictions”, then your iOS device is unlocked, but if it shows the name of any eSIM, say Yoho Mobile’s, then it is locked to that carrier.
For Android Users
- Go to your device Settings > Network & Internet > SIM/SIM card manager
- If it shows an option of “Add SIM” or “Add mobile plan”, then it is unlocked; otherwise, it is locked.
How to activate an eSIM plan (QR, apps, scanning)
With your compatibility and lock status in check, you can now install and activate an eSIM on your device. A good example is Holafly eSIM in Canada which we will use to guide you through purchasing and activating an eSIM plan.
On iPhone
- Purchase your Canada eSIM from the Holafly website, install it, and choose a data plan.
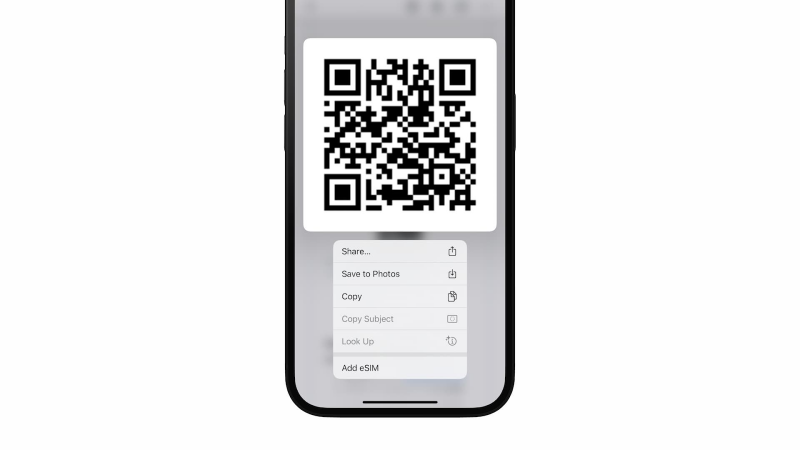
- Receive a QR code and instructions via email, print it out, or open it using another device.
- Go to your device's “Settings”, the “Cellular” option, and lastly click on “Add eSIM”
- Scan the QR code you received earlier using your phone camera
- When prompted, label your new plan and enable data roaming
On Android
- Purchase and install the eSIM software from the Holafly website and select a Canada data plan.
- Receive a QR code and instructions by email, open it on another device, or print it out.
- Go to your device Settings app and select “Network & Internet”, then proceed to “SIMs” and lastly “Add eSIM”
- Select the “Use QR Code” and scan the code you receive via email
- Turn on “Mobile Data” and “Roaming” for this eSIM, and you are ready to go.
Managing multiple eSIM profiles or dual SIMs
One of the significant advantages that eSIM has introduced is effortless connectivity. Gone are the days when you had to juggle multiple phones or fumble with tiny SIM cards. With eSIM technology, you can manage multiple network profiles without a sweat.
Here’s how to go about it:
- Confirm your device compatibility and ensure that it allows for dual SIMs
- Use QR codes emailed to you by the eSIM providers to add profiles to your devices. Ensure you store these profiles for easy switching.
- Assign unique labels to each eSIM to allow for easy differentiation
With the profiles set, you can switch from one default profile to another. Please note that some devices will not accept multiple active eSIMs simultaneously, and other carriers can also limit switching between different profiles.
Troubleshooting common issues (coverage, fallback, errors)
Below are some of the most common issues you can encounter while using eSIM and how to quickly fix them:
- Setup and activation errors: If you are unable to complete your cellular plan setup, or the eSIM activation failed, then you can restart your device, use a strong WiFi, and ensure the VPN is turned off.
- No SIM or "SIM not provisioned": This means your phone can't detect or verify the eSIM profile. To fix this, redownload the eSIM from your carrier app, check if the eSIM line is enabled, or confirm the compatibility of your device.
- QR code won't scan or is invalid: This can be because the code has already expired. You can also scan it directly via a screen instead of printed paper.
- No cellular service: When you have your eSIM installed but still receive messages like “No service, searching…” or blank signal bars, you can turn the Aeroplane mode on and off. You can also reboot your device and check the eSIM status or wait up to 24 hours for new activation.
- Your eSIM only works at home, but not abroad: To fix this, you can turn on data roaming or restart your phone. Additionally, confirm your eSIM plan supports coverage in your current country or manually select a local carrier.
- Switching between SIMs causes conflict: You can deactivate or delete your unused profiles or assign the correct data, voice, and SMS in SIM manager or cellular settings.
For successful troubleshooting, you must understand why your eSIM might not be working. You then research or consult on how to best fix the problem.
Tips for future portability and smooth switching
The real trick behind smooth switching and portability is device compatibility. Once your device is compatible and can successfully run multiple profiles, you will have an efficient eSIM experience. You can also clearly label each eSIM, save unique ICCIDs, deactivate profiles you are not using, and check your active eSIMs before confirming their validity.
Lastly, remember that security is paramount. Use strong passwords, enable remote management features, regularly update your device security features, and activate lock and erase functions if your device goes missing.
Post Comment
Be the first to post comment!


